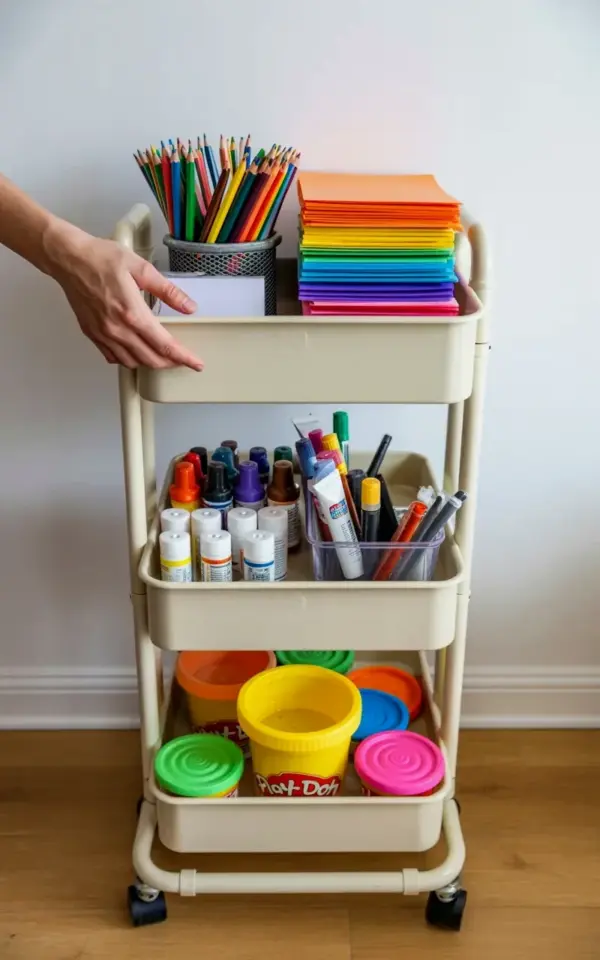
You’re standing in front of a white three-tiered rolling cart, and somehow it already looks better than the drawer of chaos you’ve been fighting. The top tier has colored pencils standing upright like a tiny forest, and rainbow construction paper tucked into a stack. Middle shelf? Clear bins full of markers and paint tubes. Bottom shelf? Play-Doh containers in yellow, green, and pink, with the yellow one front and center. It’s not a fantasy organization board. It’s a practical art supplies setup for kids that actually survives daily use.
I’ve tried the “put everything in a closet” method. That failed. I tried the “dedicated art table” approach. That became a dumping ground for homework and mail. What finally worked was giving every supply a visible home on wheels. So this article is about setting up your own rolling cart, but more importantly, it’s about the thinking behind it.
Why a Rolling Cart Beats a Permanent Storage Unit
Kids don’t organize in straight lines. They work on the floor, on the kitchen table, or right along the edge of the couch. A rolling cart goes where the art project happens. That simple fact changes everything.
Look, I have a real craft room now. But even with that space, I constantly roll this cart into the dining room for afternoon activities. It’s easier than carrying armloads of supplies. And when the session is over, everything rolls back to its spot in the corner. No dragging boxes. No forgetting where the scissors went. The wheels are doing the heavy lifting.
Also, the light wooden floor matters. The cart moves silently across it, which means you can sneak it into another room while the kids are napping. That’s a feature, not a bug.
Three Tiers, Zero Confusion: What Goes Where
The genius of a three-tier cart is that it forces you to make decisions. You cannot shove a hundred things into each level. You have to assign a job to each shelf, and that job becomes the habit.
- Top tier: daily use items like colored pencils and construction paper.
- Middle tier: marker sets, paint tubes, and small tools in transparent containers.
- Bottom tier: bulkier things like Play-Doh, especially the chunky containers.
That’s the whole system. It’s not complicated. But here’s the thing: the top tier works best when you keep it mostly flat. Colored pencils in a tall cup are fine. Construction paper in a neat stack is fine. If you pile anything higher than the basket edges, it all becomes a mystery pile. So keep the top shelf scannable at a glance.
The Top Tier Trick: Color Pencils and Construction Paper
In the photo, the top tier has colored pencils arranged vertically. That’s not just for looks. Standing them up makes it easy to grab a single pencil without digging through a tangled heap. In my experience, a simple mason jar or a solid pencil holder works better than those flimsy pouches.
Rainbow construction paper belongs next to the pencils. I keep it in a stack, not a folder, because kids tend to pull the whole pile regardless. When they’re working, they flip through colors like a painter’s palette. If you want to stay sane, only keep about twenty sheets of each color at a time. Refill from a stash in a cupboard when the stack starts getting thin. That way the cart never turns into a paper landfill.
Honestly, the top tier is the performance zone. It’s what your kid sees first. If that looks organized, the whole cart feels organized.
Middle Tier: Clear Containers for Markers and Paint Tubes
The middle level is where a lot of parents mess up. They just place raw marker boxes and loose paint tubes onto the shelf. Within a week, the caps are missing and the colors are scattered. The fix is right there in the photo: clear storage containers.
I’m a big fan of the clear bins with handles, because you can pull the whole container out and put it on the table. You don’t need to lift each individual marker. Same goes for paint tubes. Grouping them in a single bin means your child sees the collection, picks what they want, and everything else stays safe in the basket. And yeah, clear containers mean you can spot when something is out of place immediately. In a small playroom, that’s worth a lot.
One weird little detail: I label the front of each bin with a sharpie on masking tape. Not because the kids need labels, but because I forget what I decided. When the tape gets messy, I replace it. That’s it.
Bottom Tier: Play-Doh Storage Without the Crumbling Mess
Play-Doh is the hardest thing to store, and that’s exactly why it belongs on the bottom shelf. The bottom tier is the least visible, so it can handle the visual noise of mismatched containers. In the photo, you see yellow, green, and pink Play-Doh. The yellow container is prominent, probably because that’s the one most recently used. That’s normal. That’s how it goes.
The real trick is to check the lids after every session. If you don’t, the next time someone opens a container, they’ll find a dried-up brick. I learned that the hard way. So I keep the Play-Doh on the bottom shelf with nothing else. That way, when a kid reaches for it, they have to bend down, grab one container, and put it back. No stacking. No avalanches.
For smaller playrooms, you can use a shoe box or a fabric bin on that bottom shelf. But honestly, the cart’s own wire basket already does the job. Just don’t overload it.
Make Setup and Cleanup a Two Minute Habit
All the organized shelves in the world won’t help if the cart becomes a dumping zone. So I set a simple rule: every art project ends with a “cart check.” The child puts one container back before they can move on to the next activity. It’s not a full cleanup, just a general reset of the nearest shelf.
Because everything is visible and reachable, cleanup actually takes minutes. That’s the whole point of this setup. You’re not hunting for lids. You’re not stacking boxes behind other boxes. You just roll the cart back to its corner and go eat lunch.
There’s also a rhythm to using the same cart every day. Once your kid knows that markers live in the middle clear bin, they’ll put them there without being told. Maybe not every time, but often. That’s progress.
Adapting the Cart for a Homeschool Corner or Small Playroom
If you’re setting up a homeschool corner, the cart serves double duty. On school days, the top tier can hold handwriting books or flashcards alongside the colored pencils. On art days, you swap in extra paper. The rolling feature means you can keep it in a closet during math time and roll it out for creative time. That flexibility matters when your space is small.
In a small playroom, the cart is basically a craft island. It anchors the corner without taking up floor space the way a full desk would. You can push it against a wall, or use it as a room divider if you’re brave. The white finish fits almost any decor, which is another reason I picked it over a garish plastic alternative.
One caution: don’t attach a hook or caddy to the side of the cart. It seems useful, but it just ends up catching random junk. Trust the three tiers.
Finally, Don’t Overthink It
The best organization system is the one you’ll actually maintain. This rolling cart works because it’s simple, visible, and mobile. You put colored pencils at the top, clear containers for markers in the middle, and Play-Doh on the bottom. That’s it.
If you’re staring at your own cluttered craft corner, start with this exact setup. Give it two weeks. I bet you’ll find yourself reaching for the art supplies more often, because it doesn’t feel like a project to set up. And that’s the real win. So grab a cart, some clear bins, and see if your afternoons get a little more creative. Your future self (and your child’s imagination) will thank you.
Leave a Comment