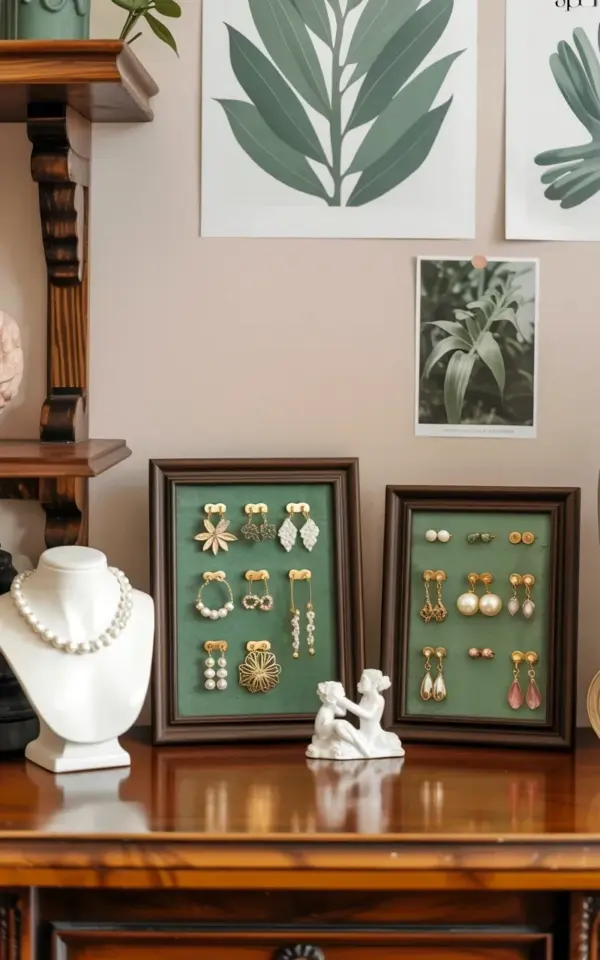
I used to lose earrings constantly. Then I made a velvet earring holder out of a thrifted frame, and it fixed my mornings forever. Honestly, the whole project took less than an hour. If you have an old frame collecting dust and a pile of earrings without partners, this is the answer you have been looking for. And the photo above? That is the version I actually live with, two dark wooden frames fitted with green velvet, one holding gold and pearl pieces, the other filled with gold and crystal earrings with pink accents. A ceramic bust and a few botanical prints turn it into a proper vintage scene. But let me tell you, the first time I tried this, I made every mistake in the book. So here are the most common ones and how to avoid them.
## How to Choose a Thrifted Frame for Your DIY Jewelry Organizer
Do not grab a frame just because the price is cheap. Look, I’ve done it, and I ended up with a bizarre orange frame that screamed 1970s garage sale in a bad way. You want something with a dark, neutral finish, like the brown frames in the photo, so the earrings get the attention. Also check the back of the frame. Is there a wooden backing board still attached? You can use it for the velvet, but if it’s bent or crumbling, you’ll need to cut a piece of foam board to fit instead. And watch out for frames with deep scratches. A few light marks add character, but something that’s falling apart is not worth the hassle. Frames with glass are fine, but you’re going to remove the glass anyway. So just take the whole thing apart at home.
## The Right Way to Attach Velvet to an Old Frame (Without Making a Mess)
Here’s the thing: the velvet is the star of this entire project. So do not use fabric that feels like sandpaper. Get a small piece of velvet from a craft store, or cut up an old velvet dress if you feel like getting resourceful. The most common mistake is using regular glue. It soaks through the fabric and leaves nasty stains. I use double-sided tape or a spray adhesive made for fabric. Lay the frame face down, trace the inner opening on the velvet, then add about an inch and a half on every side so you can pull it tight. Stretch the velvet and tape it down on the back of the backing board. If you get wrinkles, peel it off and try again, it’s not a big deal. But press firmly. A smooth, cushiony surface makes a jewelry display look intentional, not sloppy. And if you want extra padding, add a thin layer of quilt batting underneath the velvet. It makes the earring backings easier to push in and holds them more securely.
## How to Arrange Earrings on a Velvet Display Without Making It Look Messy
Arranging earrings is harder than it sounds, believe me. The first time I stuck earrings all over the velvet randomly, it looked like a chaotic dollar store shelf. You need a system. Look at the photo again, left frame has floral and geometric designs, right frame has crystal and pink pieces. It’s grouped by tone and shape. I like to put small studs in neat rows, and larger drop earrings spaced out so they don’t tangle. If you use hooks, push the post straight through the velvet and add the back on the other side. But wait, you can’t do that if the frame is hanging on the wall, because the back of the board will face the wall and the earring posts will stick out. So most people just push the posts directly through the velvet without backs, and that works fine. For heavy earrings, like chunky gold ones, give them extra space or they’ll bend each other. Another trick is to use the darker areas of the velvet for silver pieces, they pop more. My gold earrings look amazing on the green, but if your velvet is black, go with pearls or crystals for contrast.
## Styling with Vintage Home Decor: The Finishing Touches
A velvet earring holder is not just a storage solution, it’s also a focal point. So prop it up on a wooden desk, lean it against a stack of old books, and set a white ceramic jewelry bust next to it like I did in the photo. The pearl necklace draped over the bust creates a lovely chain of texture. Add a small plant, or some botanical prints on the wall behind it, and suddenly you’ve got a vintage home decor corner that looks like it belongs in a catalog. But don’t overdo it. Too many decorative objects can make the earrings disappear. Stick to one or two supporting pieces. In my setup, the green leaf print on the wall mirrors the green velvet, which ties the whole visual together. That kind of coordination is subtle, but it makes the difference between decor and clutter.
## Why the Wall Behind Your Velvet Earring Holder Matters
Here’s a mistake nobody talks about: ignoring what’s behind the frame. If you prop your earring holder against a plain white wall, it can look empty and lost. The botanical artwork in the photo is there for a reason. A large green leaf print and a smaller plant photograph add height and context without stealing attention from the earrings. If you don’t have botanical prints, use any art with muted colors. Or hang the frame on the wall at eye level. But then you have to consider the weight. Velvet, frame, earrings, all of that adds up. Use a sturdy wall anchor, not just a nail. You don’t want to hear a crash at three in the morning when the nail gives out. And for rental spaces, propping is the smarter choice anyway. Just lean it on a shelf or a vanity and it stays stable.
## How to Keep Your Velvet Earring Holder Dust-Free and Organized
Ok so this is the boring but necessary part. Velvet attracts dust like you wouldn’t believe, and it’s a magnet for tiny hair and pet fur. A quick fix is to use a lint roller once a week. Gently roll it over the surface without pressing too hard, or you’ll pull out the earrings. Another common mistake is putting too many earrings on at once and then never taking them off to choose one. You’ll see the same few pairs all the time, while the ones underneath become forgotten. Every month or so, I rearrange my earrings. Move the ones in the back to the front, group by color again, and take a minute to clean the posts with rubbing alcohol. It keeps the display useful instead of just pretty. And honestly, if an earring falls off and gets lost under the desk, just accept it. I have a small jar of single earrings that lost their partners, waiting for the day I find the matching pair. The jar is cute, but it’s a sign that I need to be more careful.
So yes, a velvet earring holder is a simple project, but the details matter. Take your time with the velvet, choose a frame that complements your room, and style it with a few vintage pieces that make you smile. The version in the photo took me maybe two afternoons to get right, mostly because I kept rearranging the earrings. You can definitely do it faster. Have you tried something like this with a thrifted frame? I would love to know how it turned out, or if you ran into any issues. Drop a comment below and tell me what you made. Happy thrift hunting!
#velvetearringholder #jewelrydisplay #thriftdecor #diyjewelryorganizer #vintagehomedecor
Leave a Comment